Last updated August 2020
The Map Tab gives you a visual representation of your A2J Guided Interview. The Map Tab contains a list of the questions in the A2J Guided Interview and a Flowchart. From the Flowchart, you can also outline an entire A2J Guided Interview. In August of 2020 we added new map enhancements that allow you to add new pages and make branching connections between pages easily. You can also edit the content of the questions by accessing the Question Design Editor (QDE) from within the Map Tab.
Flowchart
To the right of the question list on the Map Tab is a graphical map or flowchart depicting each of the interview questions (figure below). Each box or node represents a single question. The box contains the name of the question and have a background color that corresponds with the color assigned to the particular Step to which that question is designated.
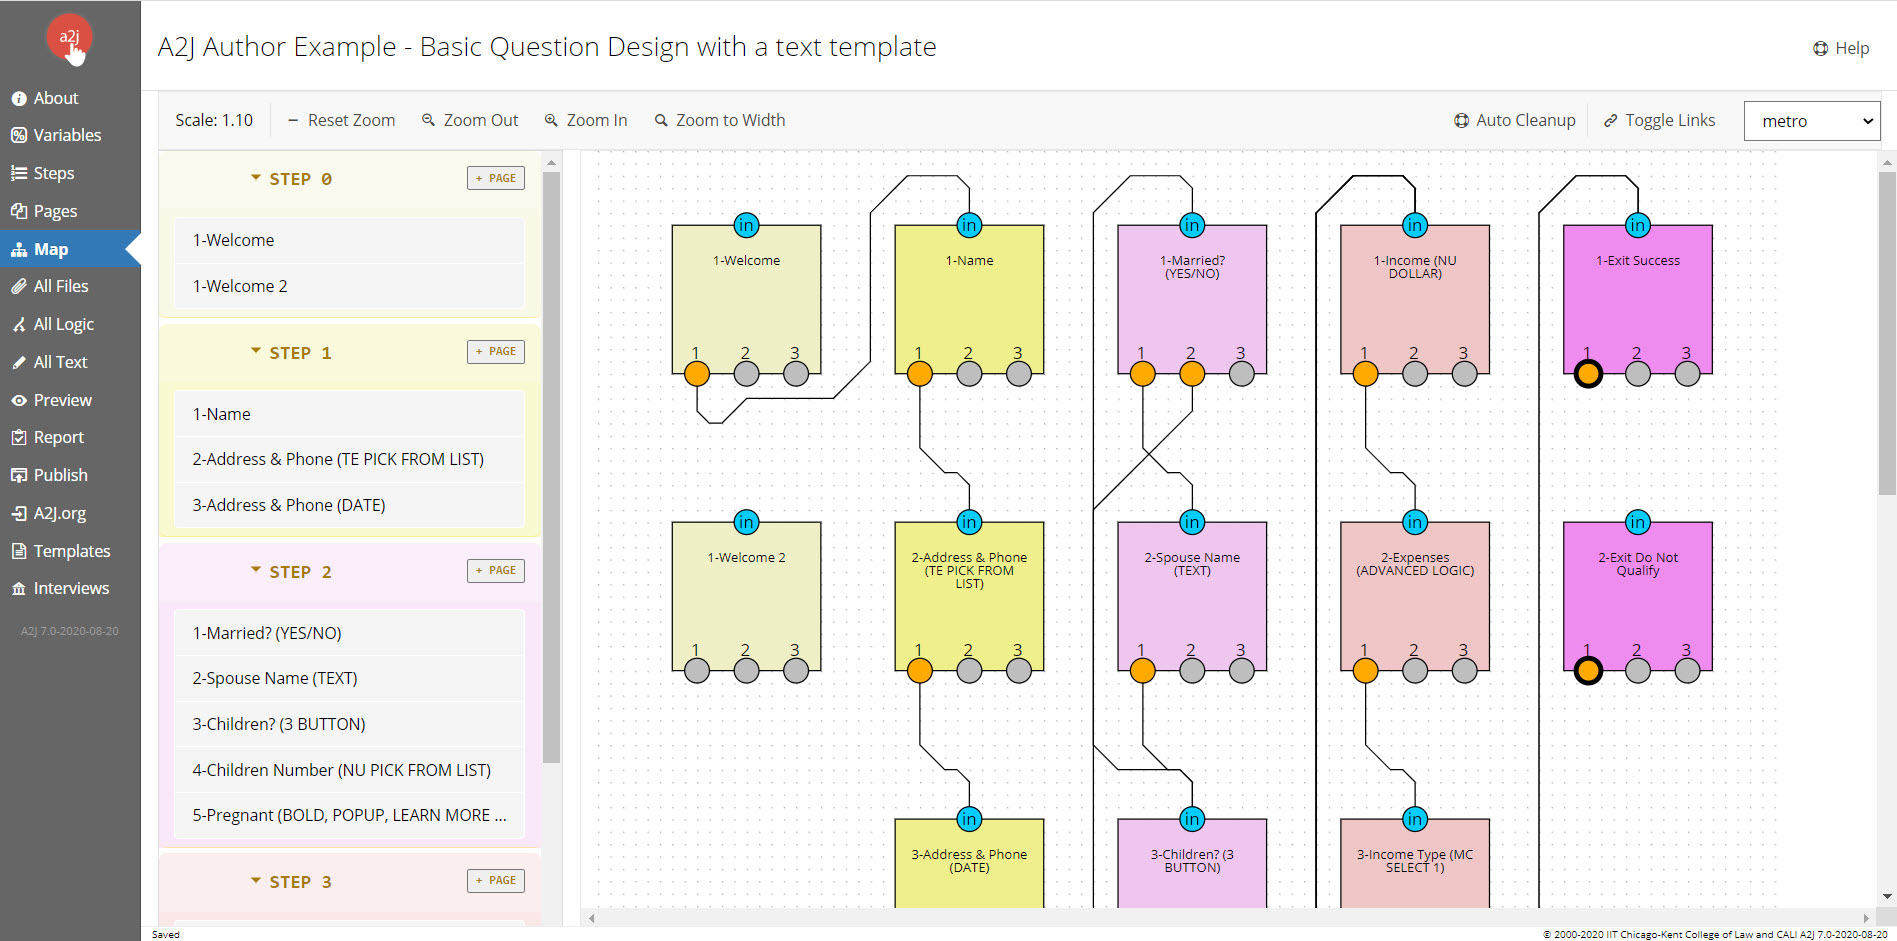
Figure: The Map Tab
The flow of the interview or how pages are connected to each other can be seen in the Flowchart. The flow of the Pages is depicted by a line leading from one button to another Page. It is possible to open the Question Design Editor (QDE) by double clicking on a page in the Flowchart or in the Question List.
Button Circles
Each page can have up to three buttons. Each of these buttons can go to a different destination page or the same page based on the author's preferred flow of the interview. The Flowchart shows these three button options. Only buttons that are gold/yellow colored are connected to other pages. If the button is unlabeled and unconnected to another question (unused essentially) it is gray in color.

Figure: Buttons on a page. Only button 1 is "active" and connected to another question. Buttons 2 and 3 are unconnected and therefore "inactive".
Lines from one button to another page
Shows that one question has been connected or “branched” to another question. This is done by selecting the second question as the destination question in the Buttons section of the Question Design Window of the first question. The color of the line corresponds with the Step color for the first question.
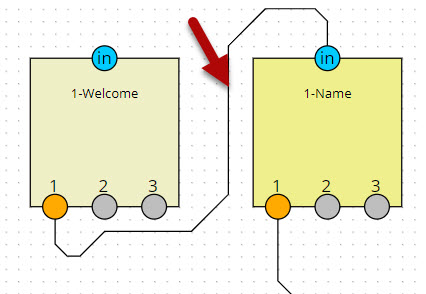
Figure: Branching line.
"In" Circle
This is where you draw or drag the connecting line from a button to connect it to that page.

Figure: Line connecting button 1 of page "1-Welcome" to "1-Name"
Special Destination Buttons
Some buttons have special destinations. These are generally "Exit" buttons that move an end user out of an interview. They are visually represented on the Flowchart with an emboldened circle around the button circle. All of the Special Branching destinations available for authors to select from, except the [no where] option, trigger this special visual designation in the Flowchart.

Figure: Special button designation

Figure: Destination options that trigger the special button designation
Add a Page
You can add new pages to your interview by clicking the + PAGE button  in the outline of Page Names to the left of the Flowchart. By default, your blank A2J Guided Interview comes pre-loaded with four questions and four steps (figure below).

Figure: Blank A2J Guided Interview with default pages
Each step has its own add page button, so when you click the button in that step, the new page will be added to that step and placed accordingly into the map. A single click on the name of the Page from the list or on the node (box) that represents the page will highlight that page as the focus of the Flowchart (see figure below). You can edit the page, including changing its step, all text, adding fields, etc, by double clicking on the page name or the node.

Figure: Highlighted page 1-Introduction
Connect Pages Together Via Buttons
You can connect pages together by dragging a line from one button to an "In Circle" for another page. This connects that button to that page. See gif below. The creating of this connection changes the flow of the interview. It's the same as setting the destination of that button to that page via the Buttons section of the Question Design Editor (QDE).

Figure: Gif of connecting pages by dragging lines.
You can change the destination page by dragging the line to another page. You can also break the connection by hovering over a connecting line and clicking the red "X" button (see gif below).

Figure: Breaking the connection between pages.
Zoom and Auto Clean Up
There are several options for changing your view on the Flowchart. You can zoom in or out on the flowchart to focus your view on a specific Question or set of Questions using the Zoom Tools on the tool bar (figure below). The Zoom Tools are located in the top tool bar.
The Zoom Tools allows you to “zoom in,” “zoom out,” or “zoom to width”. Selecting “zoom to width” will use the furthest right page as the boundary for the outer edge of the Map. Then it will shrink the other pages to fit accordingly.

Figure: Zoom Tools
The Map also has the ability to Auto Cleanup the Pages. The Auto Cleanup button (figure below) sorts the pages by their Step and lines them up in evenly spaced columns according to Step number. See the gif below for an example of how a messy map can be quickly sorted and made into a great visual using the Auto Cleanup button.

Figure: Auto Cleanup button in Tool bar

Figure: gif of Auto Cleanup functionality
You can customize how your map looks by using the Toggle Links button or by changing the line styles. The Toggle Links button turns off the lines that connect your pages together. The drop down list that is next to the Toggle Links button controls the style of the lines. By default, it is "metro" style, but you can change it to "manhattan" or "normal". See the gif below for an example of what Toggle Links does and how the line styles can change.

Figure: gif of Toggle Links and line style options.