
(Last updated August 2021)
Automate simple forms, motions, and letters entirely within A2J Author.
Prior to this version of A2J Author, an A2J Guided Interview was a front end interface for collecting answers from an end user and storing them in an answer file. The current version of A2J Author allows authors that want to generate a document from their A2J Guided Interview to do so without additional software tools. A2J Author is now an end to end solution for document automation!
The A2J Author Document Assembly Tool (“DAT”) includes the ability for authors to create brand new documents using the Text Template tool or automate on top of existing PDF documents using the PDF Template tool.
We've added an additional tab to the tool bar within A2J Author - the Templates Tab. This is where you will create your templates for use within an A2J Guided Interview.
Templates Tab - Introduction
The Templates Tab is only accessible when an author has an A2J Guided Interview open. To open a Guided Interview, go to the Interview Tab and either double click on `Blank Interview` under Create a new interview or double click on the name of an existing Guided Interview under Edit one of my interviews. Once you have an A2J Guided Interview open, you can navigate to the Template tab on the navigation toolbar along the left side of the screen.

Figure: Template Tab
This Templates tab will show you all of the Templates associated with this Guided Interview. A single A2J Guided Interview can contain multiple templates that are assembled for the end user based on logic set by the authors. For example, a Guided Interview could contain a cover sheet template, a motion template, and a template for notice of service that will be generated for all end users. Additionally, it could contain a template for notifying a spouse of the motion if the end user says they are married or specific instructions on what to do next if the end user says they have children. The templates generated can contain logic that tells A2J Author to only assemble them when certain criteria are met.
A2J DAT Text Templates
An A2J DAT Text Template has a rich text editor, supports repeat loops, provides space for custom headers and footers, has page breaks and section titles, and allows for basic IF/ELSE commands.
Creating a Template
The first step is to create a new Template. To do so, click the New Template button.

This will take you into a blank Text Template. Here is where you will do the majority of your work on your Text Template.
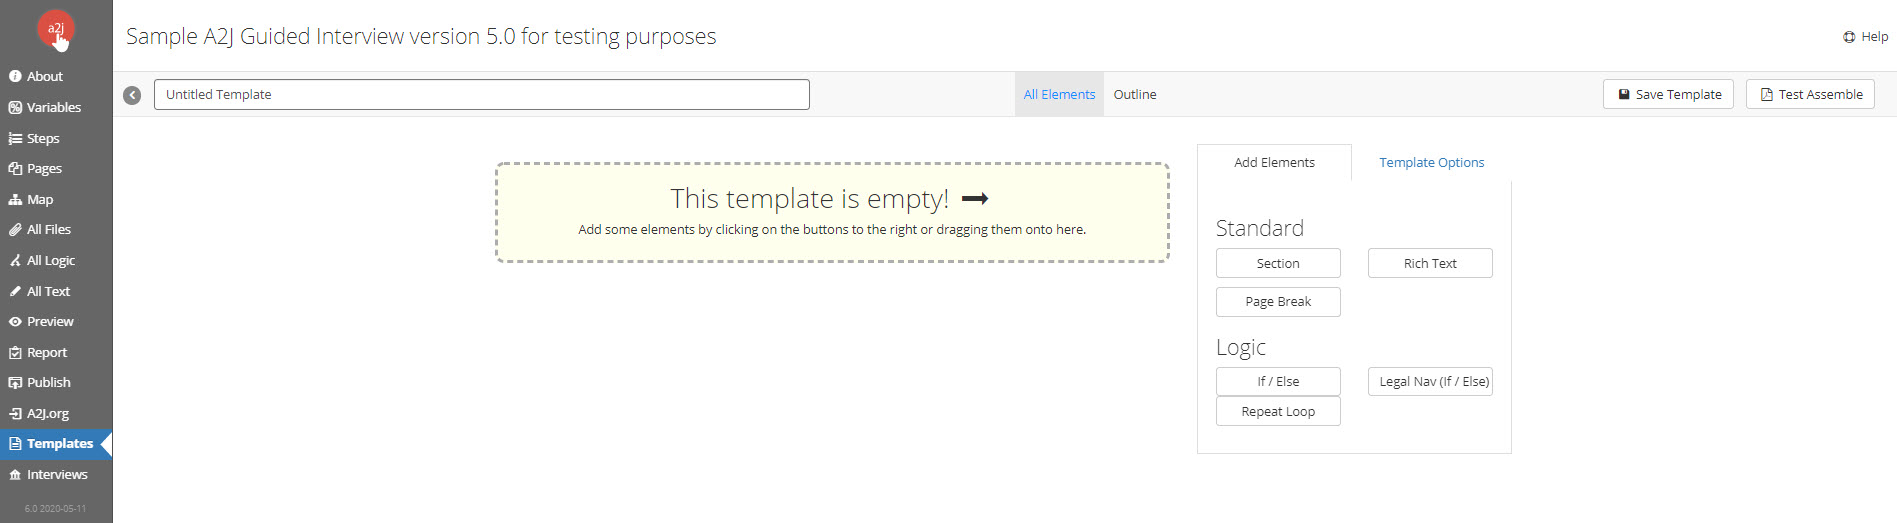
Figure: Blank Text Template
There are several tools available to you to use in building your text template. They are in the Template Design Sidebar to the right of the screen. The Template Design Sidebar includes the Add Elements tab and the Template Options tab. The Elements currently enabled in the A2J DAT are Rich Text, Section, Page Breaks, If/Else Logic, Repeat Loop Logic, and Legal Nav (If/Else).
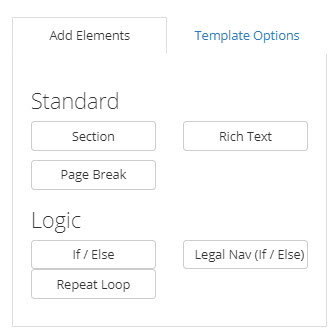
Figure: Template Design Sidebar, Add Elements Tab.
The Template Design Sidebar also includes the Template Options. In the Templates Options tab, you can create a custom header and footer. You can also change the Text Template's font, font size, and add section numbering. Finally, you can add conditional logic that will tell A2J Author whether to assemble that particular template based on some variable. For example, if the A2J Guided Interview is for a protection order, you may need additional documents to print for the end user if they have minor children.

Figure: Template Options in Template Design Sidebar
To build a Text Template, you will need to add elements to it. Double click the Element that you want to add to the Template. A unique Element Editor will then display for each available Element.
Rich Text Editor
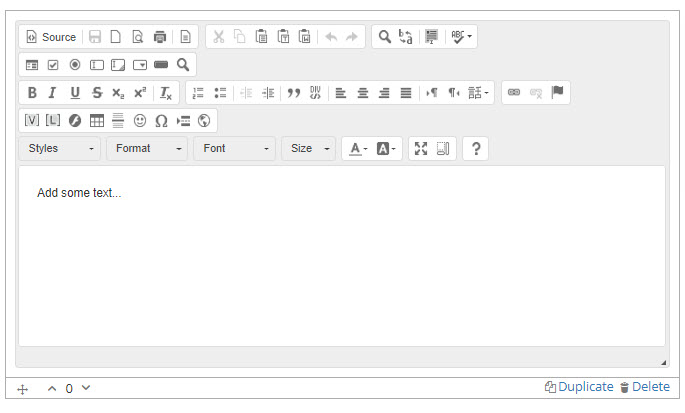
Figure: Rich Text Editor Element Added to Template
The above screenshot shows you what it looks like when an author adds the Rich Text Element to the Text Template. The Rich Text Editor allows you to add text and edit it. The options are fairly extensive. They include the ability to embolden, italicize, strike through, underline, add supra and subscripts, and insert block quotes. The Rich Text Editor allows you to add lists either numerically or with bullet points. You can also indent and outdent the text, hyperlink to external URLs, add checkboxes (both unchecked and checked), tables, and spell check it. You can add styles to chunks of your text, change the format, font type (options are specific to your browser), and font size. Most importantly for document assembly purposes, you can insert variables.
Inserting a Variable
To insert a variable, click the Variable Insert button  .
.
It is located in the bottom row of the Rich Text Editor.
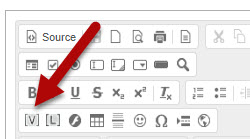
Figure: Insert variable button highlighted.
When you click the Variable Insert button, a field will display that allows you to start typing the name of a variable. It will offer variable name suggestions based on the characters that you have typed and how they match up to variables already present in your Variables Tab. When the variable you'd like inserted appears, you can click on it to insert it into the document.

Figure: Variable Insert Tool.
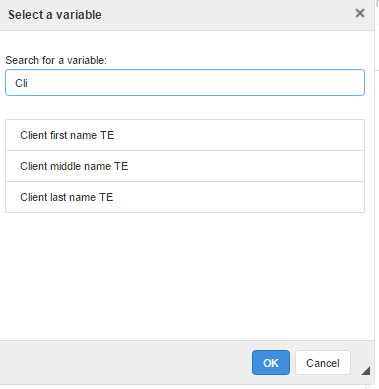
Figure: Variable Insert Tool with character based variable search shown.
This is what an inserted variable looks like. A variable is blue when it appears in the template. It will appear normally in the assembled document.

Figure: Inserted Variable in the Rich Text Editor.
You can format your inserted variable according to a number of styles.
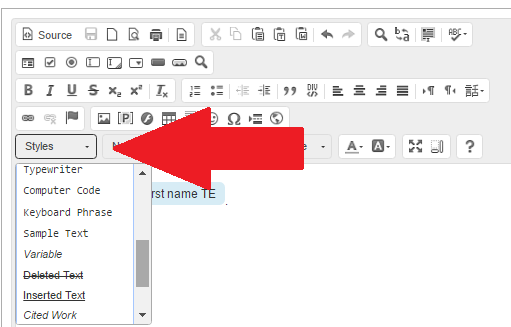
Figure: Styles available for formatting a variable.
You can also leave notes for yourself or future developers in the box to the right of the Rich Text Editor. These will not assemble in the final document, but will only display within the A2J DAT authoring suite.
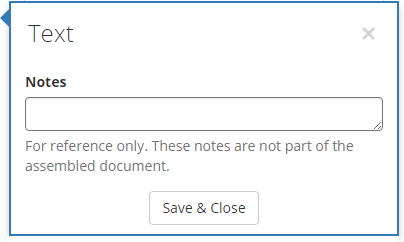
Figure: Notes Field in Rich Text Editor
Once you are finished with the Rich Text Editor, click the Save & Close button under the Notes Field to save that Element.
Section
The A2J DAT allows you to add in Sections.

Figure: The Section Element is available in the Add Elements Tab of the Template Design Sidebar.
Sections are similar to headings. They can be larger than the standard text and can be underlined.

Figure: Inserted Section Element
When you have the Section Element open, as seen in the screenshot above, you can duplicate it and delete it. Once you are done editing your Section Element, hit the Save
& Close button in order to save your element.
Page Breaks
The A2J DAT allows you to add in Page Breaks. Page Breaks tell the PDF Generator where to end the current page and begin the next.

Figure: The Page Break Element is available in the Add Elements Tab of the Template Design Sidebar.
This can be useful if authors need to ensure that certain information is contained on certain pages and the length of the end user's answers are unknown. It also allows the author the ability to ensure the next Element starts on a new page.

Figure: Page break inserted into a Template.
The Page Break Element also lets you add notes about the element that can be useful for future developers. These notes are not part of the assembled document and will only be visible to authors viewing the Template within A2J Author Document Assembly Tool.
IF/ELSE
Authors can conditionally insert elements into their Template based on IF/ELSE logic. You can conditionally insert Rich Text, Repeat Loops, Section Breaks, and Page Breaks. To insert an IF/ELSE element, select the IF/ELSE option from the Add Element Tab of the Template Design Sidebar.
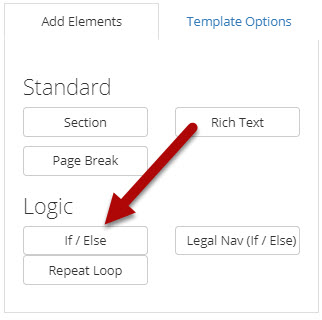
Figure: IF/ELSE element in the Template Design Sidebar.
Once the Element is added to the Template, you are able to add the variable upon which the conditional elements will be based.

Figure: IF/ELSE element added to the Template.
Just as in other areas of the A2J DAT, when you start typing a variable, the A2J DAT will automatically pull a list of all the variables that match the letters you have typed in. You can then select from that list.

Figure: Variable auto populating within the IF/ELSE conditional.
Your IF/ELSE conditional can be based on a variable of any type. You can set the condition to be based on whether a true/false variable is true or false, whether a variable equals or does not equal a value, or whether a variable is greater than or less than a value.

Figure: List of options for setting a variable within the IF/ELSE conditional element.
If you select “equals,” “does not equal,” “is greater than,” or “is less than” you can then add a variable or a value to be evaluated against that initial variable.
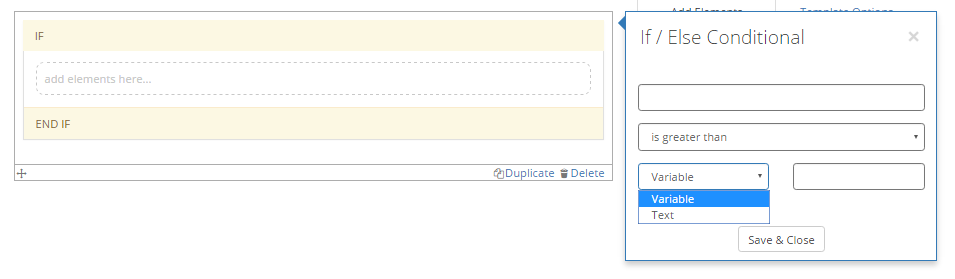
Figure: Space to add a variable or text value to be evaluated against an initial variable.
Finally, you can select whether you want to include an ELSE statement. Not every IF/ELSE conditional requires an else statement. You may choose to just have an IF component to your Template. If you check the “Else” box, an additional section will be added to the IF/ELSE element that will allow you to add Rich Text, Section Break, Page Break, or Repeat Loop.
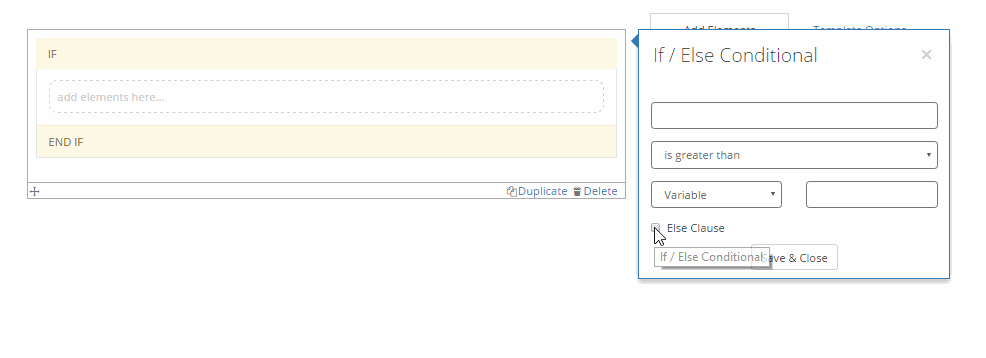
Figure: Gif showing an ELSE section being added to an IF/ELSE Conditional.
Once you’ve set up the parameters upon which your elements will be conditionally inserted, click “Save & Close” to save the IF/ELSE Conditional.
You can now add the elements that you want to be conditionally inserted. You do this by clicking into the field where it says “add elements here…”. When you do, a dialog box with the available elements will appear.

Figure: “Add elements here…” section and the Add Elements Dialog.
To add an Element to either the IF or the ELSE part of your conditional, select the element by clicking on it. There is no limit to the number of elements that can be added conditionally. The Rich Text, Section Break, Page Break, and Repeat Loops work exactly the same way as they do outside of the conditional element, except that they are only inserted into the assembled document if the condition you set is met. Once you’ve finished adding elements to your IF and ELSE sections, make sure to hit the “Save & Close” button again.
Repeat Loops
The Repeat Loops element allows you to create chunks of text that are repeated in the assembled document based on either a number variable or a set number of times.
To add a Repeat Loop, select that element from the Add Element Tab of the Template Design Sidebar.
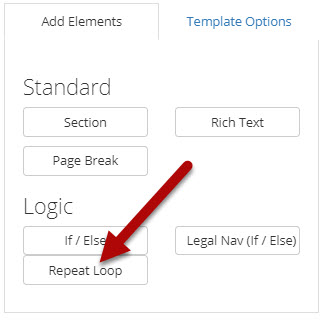
Figure: Repeat Loop Element in the Template Design Sidebar
Once you select the Repeat Loop element, the Repeat Loop options dialog will appear.

Figure: Inserted Repeat Loop Element.

Figure: Up close version of the Repeat Loop Options Dialog.
Within the Repeat Loop options dialog, you can add a title to your repeat loop section. The size of this title can be controlled by the Title Size field. The Title Size field allows you to choose from six different heading sizes, ranging from Heading 1 to Heading 6. Heading 1 is the largest and Heading 6 is the smallest.
The repeat loop can be repeatedly assembled in the finished document based on a set number of times or on a counting variable set within the A2J Guided Interview. If you choose to set it based on a set number of times, you must enter that number when creating the repeat loop. To set it to a counting variable (a variable used within an A2J Guided Interview to track how many times a user has been through a repeat loop of questions), select “For each variable” under “Repeat each:”. Then type in the counting variable that you would like to use. Just as in other areas of the A2J DAT, when you start typing a variable, the A2J DAT will automatically pull a list of all the variables that match the letters you have typed in. You can then select from that list.

Figure: Two options for setting how many times a repeat loop is assembled in the Template.
There are three options for how your repeat loop can appear in the assembled document. You can choose from a table, a list, or a text block.
Table

Figure: Repeat loop in a table with a border.
The repeat loop table can be bordered, condensed, or striped rows. Selecting “bordered” puts a faint border around the entire table, dividing each part from the others. Selecting “condensed” removes the borders, leaving just a faint dividing line between the column title and the repeated variable. Selecting “striped rows” is similar to “condensed”, but includes a colored block behind every other row in the table.
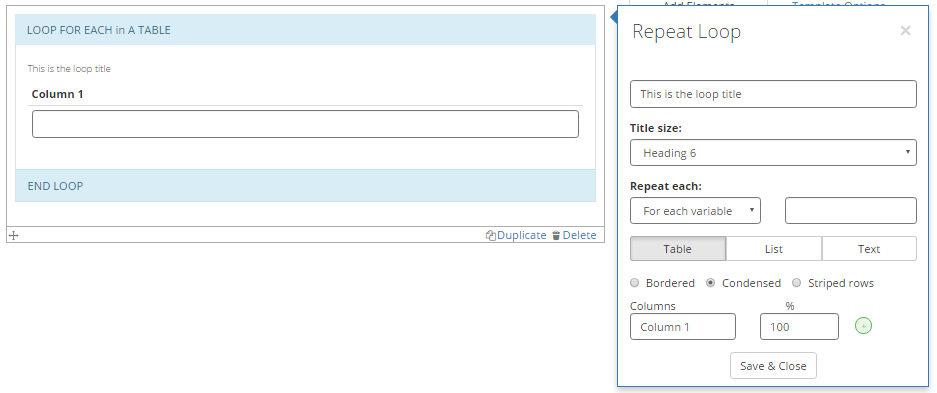
Figure: Repeat loop table with a condensed border.
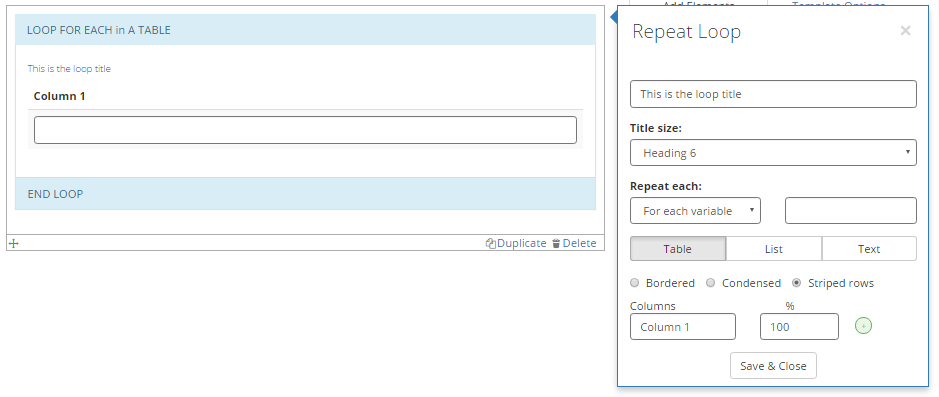
Figure: Repeat loop table with striped rows.
By default, a repeat loop table will have 1 column at 100% of the allotted space. You can add columns and the A2J DAT will automatically size them proportionately. You can change the percentage of the space allotted manually though. There is no limit to the number of columns within a table. You can also delete any columns that you have added. Every repeat loop table must have at least 1 column though.

Figure: Gif showing how an author can add and delete the number of columns in a repeat loop table.
Finally, you can change the name of each column. By default, the columns are named “Column 1,” “Column 2,” etc. You can edit the name of the column or delete the name all together.
Now it is time to insert the variables you want to be repeated. Click into the field where the variable will go in the column. Begin typing the name of the variable that you want to insert. The A2J DAT will auto populate a list of variables that match the characters that you have typed.
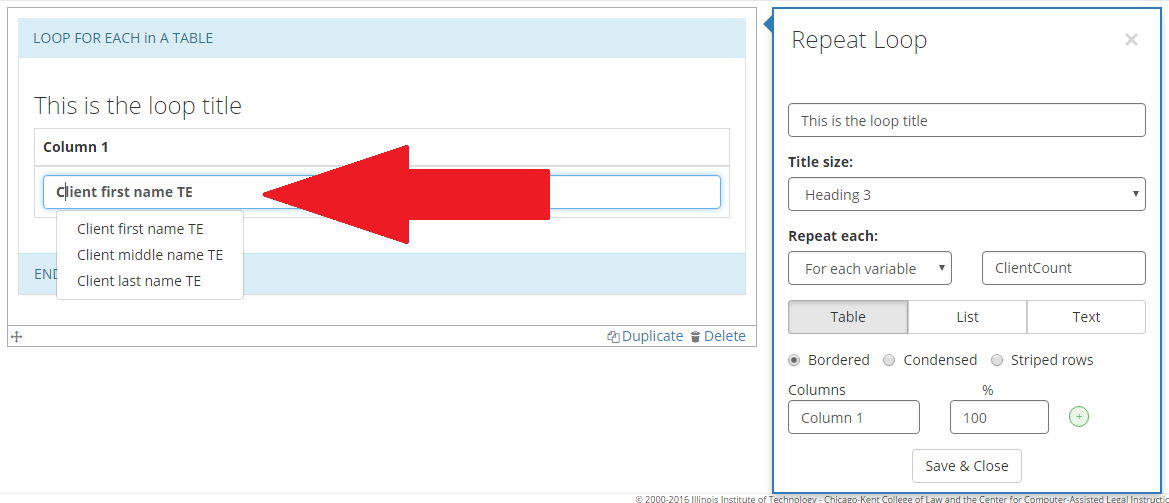
Figure: Auto populated list of variables to insert into a repeat loop table.
It is important to note that only variables which have been designated as “repeated” (i.e. set to hold multiple values) are going to display in that list. You can check whether a variable is set to hold multiple values by going to the Variables Tab and clicking on the name of the variable. That will open the Variable Editing Window. Make sure the box is checked that says “Check if multiple values.”

Figure: Variable Editing Window with variable set to hold multiple values.
Once you have selected the border style, the number of columns for your table, added a name to the columns, and added the repeated variables, hit “Save & Close” to save your options.
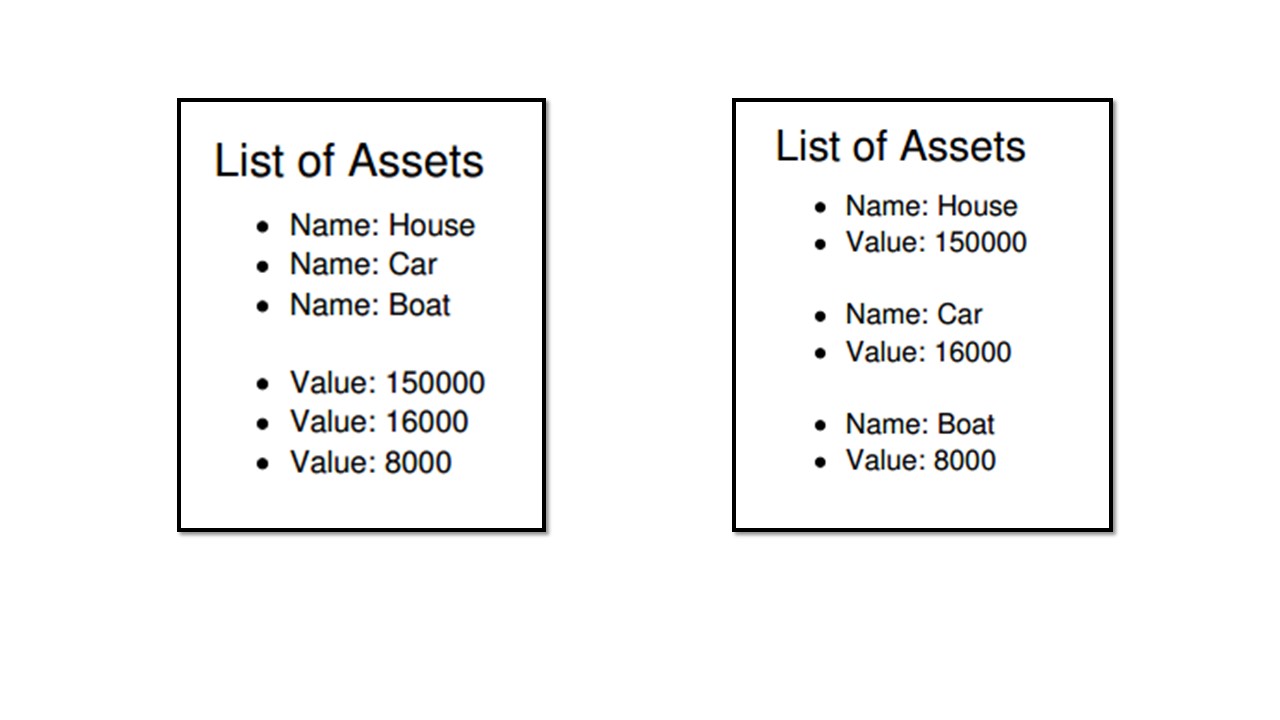
List
The second option for formatting a repeat loop is to put the variables in a list.

Figure: Repeat loop in a list format.
The list can be set to repeat each item in one list or to repeat an entire list multiple times.
Text Block
The third option for formatting a repeat loop is to create a text block with repeated variables inside of it.

Figure: Repeat Loop text block option.
This option allows you to repeat a chunk of text based on a counting variable or for a set number of times, just like the other two options for repeat loops. With this option, you have full access to the rich text editor and can use the same text editing and formatting features that are available in a rich text element. As with every element, make sure to hit the “Save & Close” button to ensure your changes are saved.
Legal Navigator IF/Else Element
The A2J Author team worked closely with the teams at the Legal Services Corporation, Pew Charitable Trusts, and Microsoft to incorporate A2J Guided Interviews into the Legal Navigator Portal. To learn more about the Legal Navigator Portal Project, check out this page: https://www.lsc.gov/simplifying-legal-help.
In order to ease the process of creating A2J Guided Interviews that could be used as the basis for the "Guided Assistants" in the Legal Navigator Portal, the A2J Author team added a custom template option and a GUID (or "Globally Unique Identifier") insert option.
The custom template option allows Legal Navigator authors to create template elements that can be properly parsed by the Legal Navigator parser. They are an If/Else element that contains a section header and a rich text element.

Figure: Legal Navigator custom If/Else Element.
The GUID insert functionality allows Legal Navigator authors to make a call to the Legal Navigator API to look up GUID resources in their database and insert them into their A2J DAT Template.

Figure: GUID insert symbol is [L] for Legal Navigator.
The GUID look up tool allows Legal Navigator authors to select their state, then high level topic, then drill down to the specific GUID resource they want to insert. The "common name" of the GUID is inserted into the A2J Template. In the actual template jSON file, there is a special tag that the Legal Navigator parser checks for that contains the GUID.
Adding the Assemble Commands to Your A2J Guided Interview
There are two new destinations for you to send your end user. As a reminder, destinations are set via the buttons section of a question in the Question Design Window. The two new destinations are [Assemble - Generate PDF document] and [Assemble - Generate PDF and Process Form].
[Assemble - Generate PDF document] - when clicked, the user’s answer file will be combined with the A2J Templates in that A2J Guided Interview. A PDF file, potentially containing multiple documents, will download to the user’s local machine. The A2J Guided Interview window will remain open for the user. No user data will be transmitted to the hosting organization.
[Assemble - Generate PDF and Process Form] - generates the PDF file for the end user the same as [Assemble - Generate PDF document], but it also transmits the user’s data to a pre-set URL via a POST and closes the user’s browser window. This is similar to what happens with [Success - Process Form], except that a PDF file is generated for the user before their data is transferred.
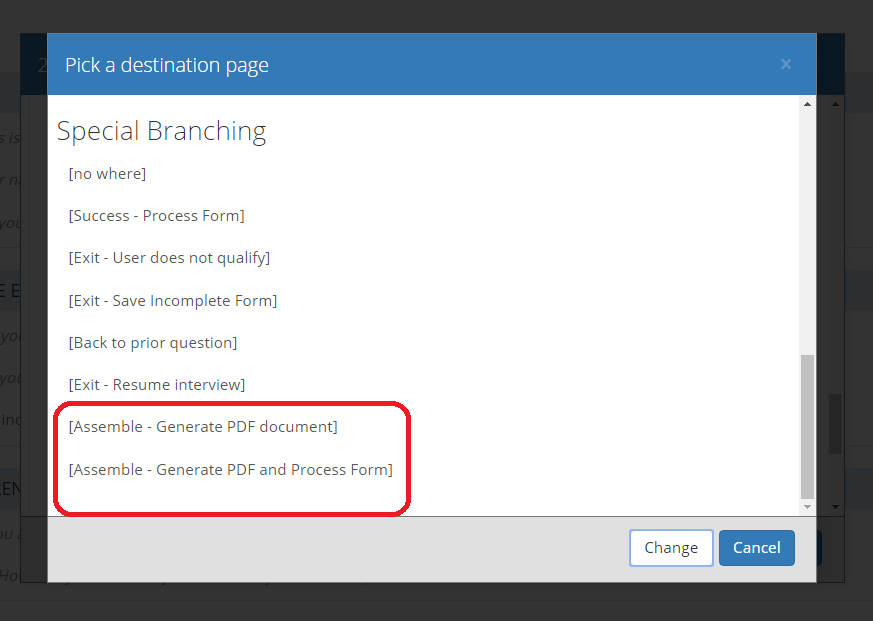
Figure: Two Assemble Commands related to the A2J DAT.
To assemble a document for your end user, you need to add an Assemble command to the last question of your A2J Guided Interview. On the last question, you should have a button called something like “Get My Document”.
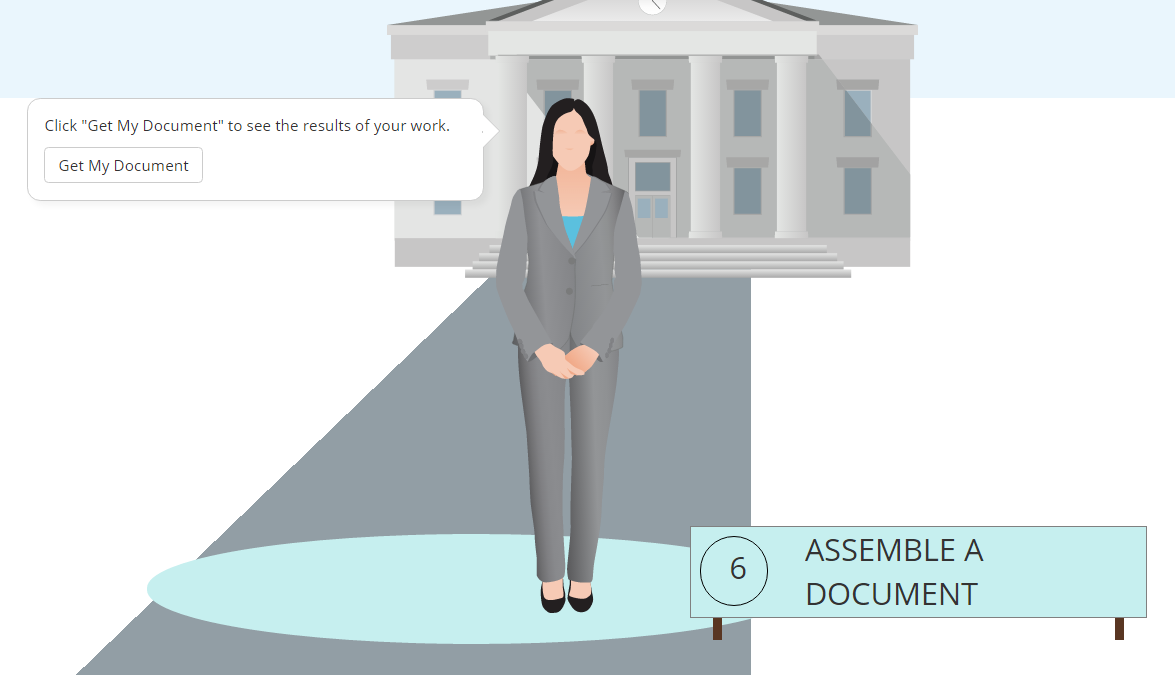
Figure: “Get My Document” button in Preview Mode.
On the “Get My Document” button, set the destination to either [Assemble - Generate PDF document] or [Assemble - Generate PDF and Process Form].

Figure: “Get My Document” button in the Question Design Window.
Saving The Template
It is important to periodically save your template. You can save your template by clicking on the “Save Template” button in the top right corner of the Template editing window.

Figure: Save Template button circled.
It is recommended that you save your template before you move to another tab within A2J Author, before you Test Assemble your Template, and before you close your browser window.
Test Assembling and Generating Your Document
When you are creating an A2J Template, it is important to test your template. To do this, you need to test assemble the template and look at the generated document. You can test assemble an A2J Template two ways. First, you can test assemble all of the A2J Templates within a given A2J Guided Interview from the Templates Tab. Second, you can test assemble individual templates while editing them.
Assembling from the Templates Tab
In order to test assemble from the Templates Tab or from within the Template editor, you need to create an answer file for which the A2J DAT will generate a document.
Creating an Answer File to Test
To create an answer file, you need to run through your A2J Guided Interview in Preview Mode with the Debug Panel open.
Figure: Debug Panel in Preview Mode.
To open the Debug Panel, click the “Debug Panel” button at the bottom of the page when you are in Preview Mode.

Figure: Debug Panel button in Preview Mode.
Once you have run through all of the questions, or as far as you want to go to create an answer file, hit the “Save” button at the top of the Debug Panel. An answer file will download to your local machine. You can save it to a specific folder or rename it if you choose. The answer file that downloads will have a .anx extension.
Figure: Demonstration of how to save an answer file from within Preview Mode.
Test Assembling Individual Template
When you are working on an individual template, you will want to test assemble it independent of the other templates in your A2J Guided Interview. To do so, open the template that you want to test by selecting it from your list of templates in the Templates Tab and clicking on it.

Figure: List of templates in an A2J Guided Interview with 1 selected.
When you have the Template editing window open, click the “Test Assemble” button from the top right side of the screen.

Figure: Test Assemble button circled.
After you click the “Test Assemble” button, a dialog box will appear that allows you to load an answer file against which to test your template.

Figure: Load Answers button in Test Assemble dialog box.
If you click “Load Answers,” your computer’s file explorer will pop up. You can then navigate to the answer file that you want to use for the test assembly. Answer files created in A2J Author are saved as .anx files. See above for how to generate an answer file from Preview Mode.
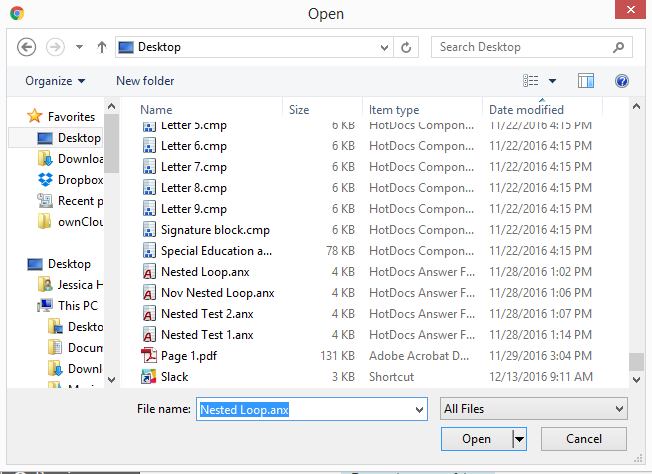
Figure: Sample answer file in local computer’s file explorer.
When you navigate to the file that you want to use, click “Open”. The answer file will load into A2J Author. You then click “Get PDF” and the A2J Author PDF Generator will assemble your document. The document will download to your local machine and you can open it to review it.
Test Assembling All Templates in the Templates Tab
Test assembling all of your templates within a single A2J Guided Interview is similar to test assembling an individual template. Start by going to the Templates Tab. You must have an A2J Guided Interview open in order to access the Templates Tab. In the Template Tab, you will see a list of all of the A2J Templates associated with this A2J Guided Interview.
Click the “Test Assemble” button in the top right corner of the Templates Tab.

Figure: Test Assemble on Templates Tab circled.
After you click the “Test Assemble” button, a dialog box will appear that allows you to load an answer file against which to test your templates.
Remember, if you have an A2J Template setup with conditional logic that controls when it assembles, that logic will test against your answer file. For example, if you have a template that only assembles if the user has children (i.e. the variable [Has children TF] is true) and your answer file does not contain that variable or it is false, that template will not assemble.

Figure: Load answers button in the Test Assemble dialog box within the Templates Tab.
If you click “Load Answers,” your computer’s file explorer will pop up. You can then navigate to the answer file that you want to use for the test assembly. Answer files created in A2J Author are saved as .anx files. See above for how to generate an answer file from Preview Mode.
Figure: Sample answer file in local computer’s file explorer.
When you navigate to the file that you want to use, click “Open”. The answer file will load into A2J Author. You then click “Get PDF” and the A2J Author PDF Generator will assemble your documents. The documents will download to your local machine and you can open them to review it.
PDF TEMPLATES
To create an A2J Template on top of an existing PDF document, you start by accessing the Template tab within an A2J Guided Interview. All A2J Templates must exist within an A2J Guided Interview. Not all A2J Guided Interviews need to have A2J Templates though.
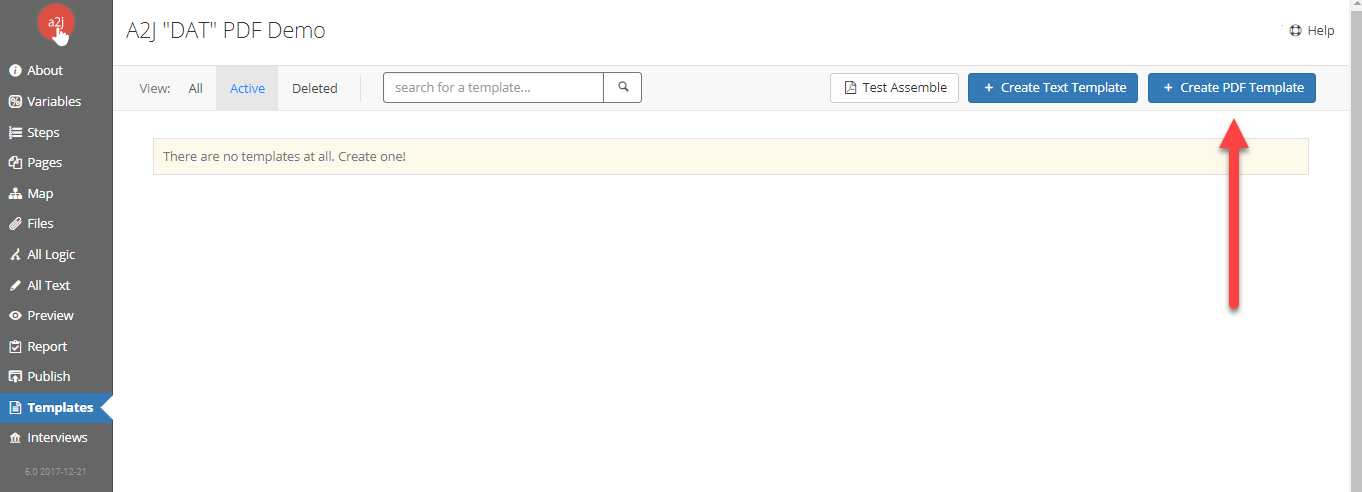
Select the “Create PDF Template” button

You will be taken to the PDF Template Editor. Here is where you will upload the underlying PDF, add variables, edit options, and automate the document.
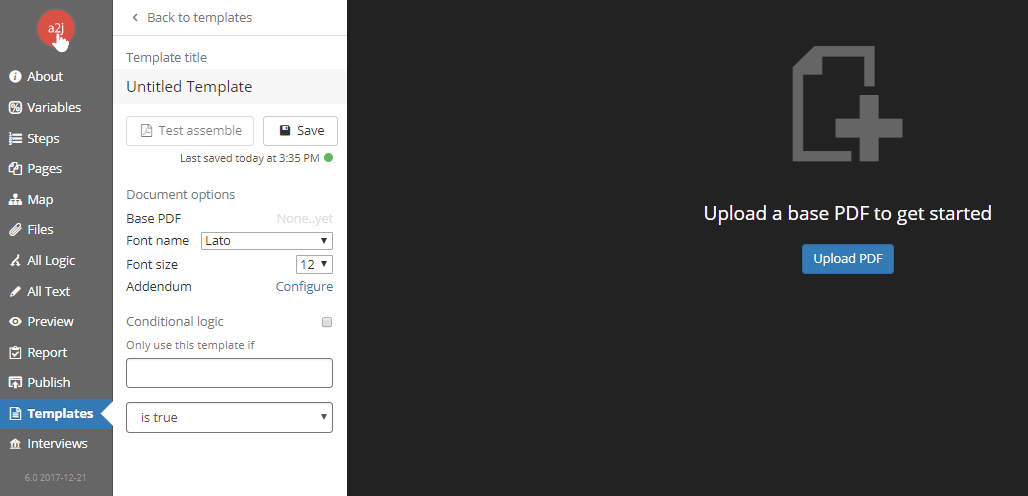
To begin a PDF Template, click the “Upload PDF” button.

This will open your computer’s local file storage explorer.
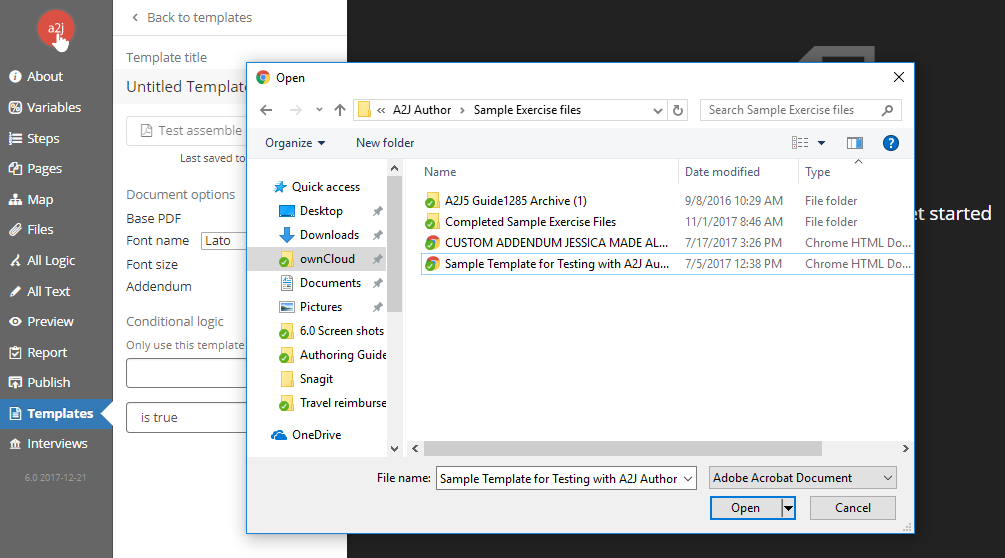
Select the PDF you want to automate, then hit “Open”. This will load the PDF into the PDF Template Editor. Make sure that you flatten any fillable fields in your underlying PDF before you upload it to create your template's base layer. Fillable fields in the original PDF will block the variable fields upon assembly and have been known to create issues when trying to upload them. To flatten the PDF, remove the fillable fields, then resave the PDF.
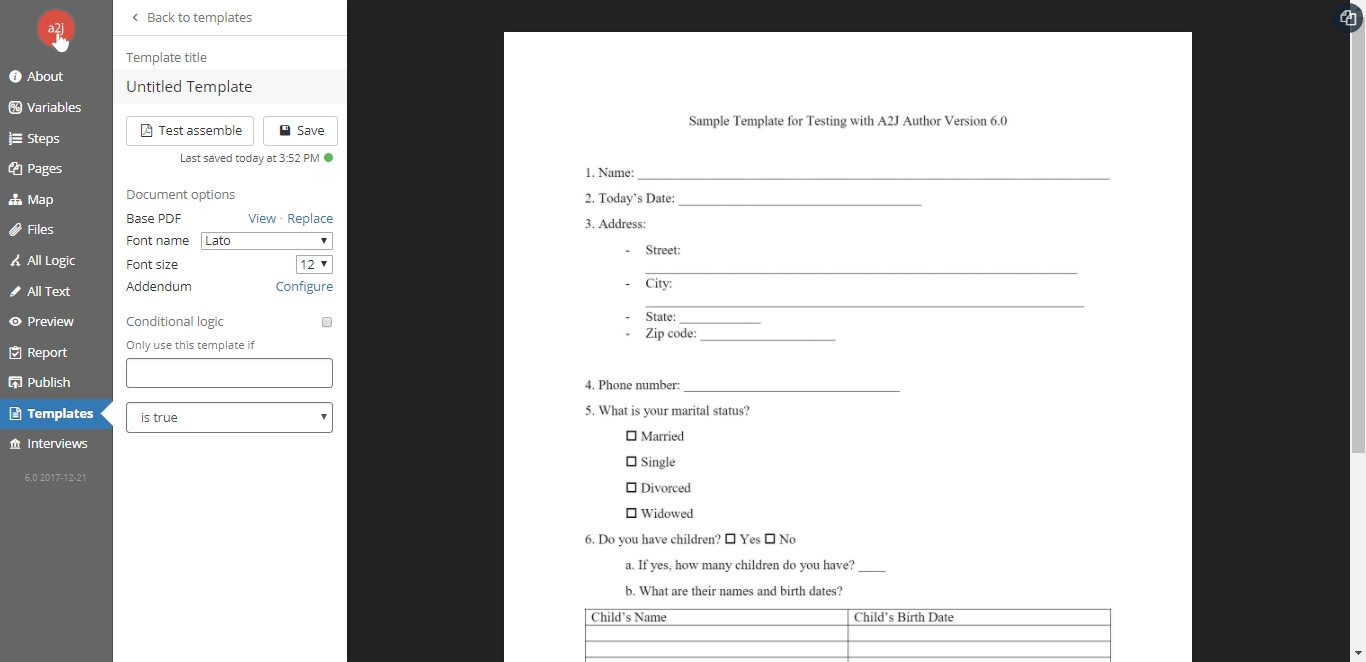
Now you can begin automating the A2J PDF Template.
Template options:
There are several options that control your entire template. They are found along the left side of the PDF Template Editor.

-
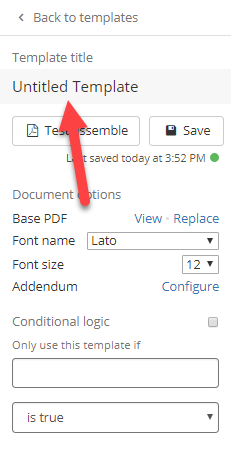
Set the template title by typing over the “Untitled Template” field.
-
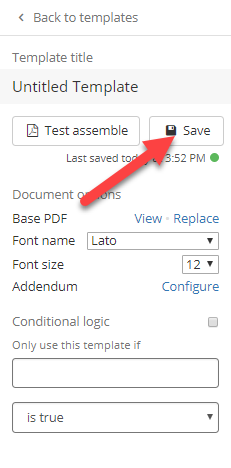
Save any changes to the template by clicking the “Save” button.
-
A2J Author tells you when it last saved your template.
-
You can view or replace the underlying “base PDF”. This means leaving in place any automation that you have done, but changes out the PDF underneath it. Clicking “view” will open the base PDF in a new tab. Clicking “replace” will open up your local file storage explorer and allow you to choose a new PDF. Note: A2J Author will throw up a warning pop up if the new base PDF has fewer pages than the current PDF. If you replace your base PDF with a PDF with fewer pages, the automation on those later pages will be lost.
-
You can change the font for the output by clicking on the drop down list of fonts next to “Font name”.
-
You can also change the font size.
-
The A2J PDF Template Tool allows you to handle overflow text with an addendum. In this editing panel, you can set the size of the addendum and its margins. To make changes to the addendum, click the “Configure” button.
-
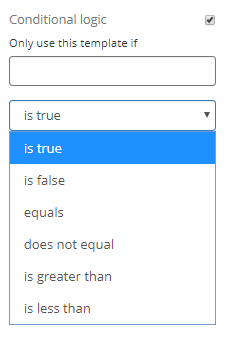
You can set this template to assemble based on a condition as well. This means that this template will not be included in the end user’s final assembled documents if the condition is not satisfied. The condition can be if a variable is true; if a variable is false; if a variable equals a value or another variable; if a variable does not equal a value or another variable; if a variable is greater than a value or another variable; or if a variable is less than a value or another variable.


Automating the PDF
The first step in actually automating the document is creating a field in which to place the variable. The field covers the blank space on the form where the user’s answer should go. To create a field, double click on the blank line on the form. A2J Author will create a box that says “unassigned variable” in the approximate height and length it thinks is appropriate for that blank space. You can adjust the height and length of the box and move its position as seen in the gif below.

Once you’ve created a field, you will want to assign a variable to that field. To do so, right click into the yellow field called “Unassigned Variable.” This will pop up the variable design editor.

From this Variable Design Editor, you can create new variables or search through the variables you already have in the Variables Tab of this A2J Guided Interview.
To make a brand new variable, simply type the name of the variable and assign it a type. If it is meant to hold multiple values (called a repeating variable), make sure to check the box next to “Check if multiple values.” You can also leave notes for yourself or future authors in the comment section. They will not be seen by the end users.
To use an existing variable, simply start typing the name of the variable. A2J Author will automatically create a list of your existing variables that match the characters that you have typed. When you find the variable you want to use, click on it to select it. You can edit the variable here as well, if you need to change the type, mark it as repeating, or leave a comment.
New to the A2J Template is the option to handle overflow text. This applies to new and existing variables. You as the author need to tell A2J Author what to do if the end user enters more text than will fit in the field. You can see the options in the screenshot above. If you are requesting that the overflow be placed into an addendum, make sure to tell A2J Author what to label that overflow section using the Addendum Label field.
Different types of variables have different options in the Variable Design Editor.
Multiple Choice variable types allow you to choose whether the value set in the interview is passed to the field (ex. [Marital status MC] has the options of “married”, “divorced”, “single”, or “widowed” and those words would be passed to the field), or you can choose to have A2J Author pass a checkmark if the value of the variable matches what you put in the “Multiple choice value” field in the Variable Design Editor.

True False variable types allow you to choose the checkmark style that is passed onto the field in the PDF Template and allow you to choose if the checkmark is passed upon true (default) or false.

Repeating Fields
A2J Author currently allows for 1 variable to be assigned to multiple fields in order to allow for repeating values of a single variable. To do so, create a field for each blank, then assign it the same repeating variable. Then group the variables together by holding down the control key and selecting all the fields for that repeating variable. Then open the variable design editor and click "Group Selected Text Boxes."

However, it does not currently have the ability to limit value to a given range (i.e. only allow for 4 answer, then run to an addendum). Authors should limit the amount of values an end user can enter to the lines available on the form. In the screenshot below, the interview limits the end user to entering information about a maximum of 4 children.

Multi-line answers
If you expect the user’s answer to go over multiple lines, like question 7 in the screenshot above, you can handle that similar to repeat variables. Create a field on each line and assign the same text variable to it. You can set the addendum conditions to handle any overflow.

Mistakes
If you mistakenly create a field, you can highlight it and delete it with your computer’s delete key.
If you want to unassign a variable from a field, open the Variable Design Editor for that variable (right click into the field), then click the “Unassign variable” button at the bottom of the editor.

Keyboard Short Cuts
The A2J DAT PDF Templates have several keyboard short cuts built into them that can help you create and adjust variable fields. To access them, use the keyboard short cut of Control + / (or Command + / on a Mac). The list of available short cuts is below:

Conclusion
The A2J DAT is a work in progress. We are committed to adding new features and addressing any issues that arise. If you have any questions or would like to request a new feature, please email Jessica@cali.org.